The best blog:

No, not this one. The Art of Manliness gave me this idea:

22 Manly Ways to Reuse an Altoids Tin

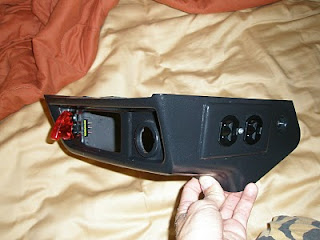
Instead of any of those ideas, however, I decided to build a voltage regulator inside one of the smaller tins, so I could charge my phone (a Motorola Droid 2) or any other device that can charge from USB, from a car, without having to spend money on a car charger (the one Verizon sells “specifically for the Droid” is $25).


I started out with the classic breadboard, to make sure that the voltage regulator would actually power the phone. I bought three from Radioshack at $1 each, with the idea that I would have less problems with heat dissipation if I could somehow parallel the outputs of the regulators. Short answer: in a parallel configuration, regulators will sort of try to regulate each other, and when I came back after five minutes the voltage had dropped from 5.1V to 2.5V and I had almost let the blue smoke out of all of them. So I just went with a single regulator. It is rated for 1.5A continuous output and has built-in thermal protection so I decided I was safe.

Once the prototyping was complete, I cut a hole in each side of the Altoids tin and started soldering everything together. The KEY lesson is here: in order for a USB port that is NOT connected to a computer to charge a device, the data pins of the device must be shorted. I learned this after a lot of fussing, but just ended up soldering the green and white wire together and protecting them with a piece of electrical tape and heat shrink.
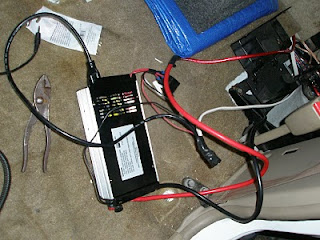
Once all the other connections were made (+12V to input, output to red wire on USB port, with the grounds for the regulator, input, and output tied together at the wire nut) I soldered the regulator’s heat sink to the tin itself, thinking this would help with heat dissipation. So far this has worked out well but the tin has a tendency to get rather warm when the device is operating. Then I covered most everything in Gorilla super glue. And the finished product…
It works pretty well charging my Droid and my roommate’s iPhone. Any way, here’s an awesome picture, just for fun:
Don’t mess with the TI-83!

A year later…

My truck is one of my ongoing projects. Already its timing belt installation, some lighting modifications, and some other things about it are up here. About a year ago I did a torsion bar crank which lifted the front of the truck about 2 inches, which made the truck look nice and level. It’s settled a little since then. Today I finally lifted the back of the truck using a set of shackles.

The factory shackle is the smaller one. The new shackles are adjustable and can obtain from 1″ to 2″ of lift over the stock shackle. I went with the 2″. The process was fairly straightforward. I used my new Hi-Lift jack to get the truck on jack stands and get the wheels slightly off the ground. Then I used a breaker bar and hammer to remove the old shackle, using my floor jack to take tension off of the leaf spring. From there it was simply a matter of attaching the new shackle to the frame and using a large C-clamp to push the leaf spring down to the lower shackle bolt.
Here is the first set of Before-And-After pictures:


And, of course, the change in the ride height is obvious, although looks much more impressive in person:


I like these pictures because the shadows tell roughly how long it took me to do all of this. But that includes going to get a burger and watching an episode of Star Trek in between shackles.

The next thing will be to install aftermarket upper control arms and ball joints on the front suspension, to get the full available 3″ of lift in the front. Those parts are sitting in my living room. Then eventually I’ll install Bilstein/Nismo shocks all around and put new leafs in the back and new torsion bars in the front. But those will wait a while.

New Amplifier

It’s about time I finished this one up. About six years ago, I inherited a speaker.

Then, I found it’s partner and had two speakers.

(Those clothes are actually all clean, btw.) I had to repair three out of the ten drivers (one low, one mid, and one high). For a while, I ran just the one on a 20-watt single-channel amplifier that I also got for free, until right before I left for college when I bought a radio from Best Buy. It turns out that the radio had a 100-watt per channel stereo amplifier in it that I accidentally discovered. Any way, I used this amplifier all the way through college, and sold it to some random guy for about half what I paid for it. It was mildly malfunctioning, so I thought I’d put the money towards an amplifier that actually has enough power for the 600-watt cabinets.

This amplifier has 500 watts per channel, five times the old amplifier, and 25 times my first amplifier. It literally shakes the entire house. But it’s nice to finally have an amp that can drive my stereo.

I may need to build a new shelf…

Power Supply!

I was in need of a power supply for electricity for my breadboard projects, and was looking to buy a DC bench power supply. Instead, I found someone on the internets that gave me the idea to build one out of an old computer power supply. Since there are other how-tos on the internet I won’t go into a lot of detail. It was a fairly painless process involving dremels and drills and lots and lots of wire nuts. Long story short, using one of any five plugs (I used phono plugs instead of banana plugs because of the low-ish amount of current I expect this supply to be able to produce), I can get DC voltages of 3.3, 5, 12, -5, and -12 volts, and by combining any of these two I can additionally get (positive and negative) 8.5, 15.5, 17, and 24 volts. The -5 and -12 terminals can only source a small amount of current compared to the +3.3, +5, and +12 terminals.

Noteworthy note: I installed a switch that shorts out two pins on what would have been the connector for the motherboard. These pins are what tells the power supply to turn on. However, when the switch is flipped off, power is not immediately removed. Currently I have to physically unplug the 120 from the back with the switch on and let the cooling fan dissipate the stored energy. The likely cause of this is one of the pins that are shorted together (the gray one, the black one is ground) needs to have a pull-up resistor to let the power supply know it’s been switched off. This mod is not worth disassembling it though, at least not right now.


Also, thanks to FREE MONEY FROM THE GUBMENT, I can now watch TV fo’ free! My roommate moved out and took the satellite dish with him, but luckily I have my 80s-era TV with rabbit ears and a brand new DTV converter box furnished by your (and my) tax dollars.

Top 11 Albums and Some Others

What five albums most influenced my life? I don’t know about influenced… but I have been thinking about that for quite a while, and while this may be a nontraditional post for this blog I think it’s worth mentioning. I couldn’t narrow it down to five, so I picked ten that changed my life most, and added one. Plus 19 honorable mentions. These are 30 albums that represent something or someone to me, and since most of the music I listen to reminds me of “oddly specific” events or people, if you listened to one of these with me or noticed me listening to it a lot chances are it reminds me of you or whatever was going on at that time. The first 11 are presented in order. No artist is represented twice (although some easily could be) and the last 19 are presented in no particular order. But! I think it will be interesting to look back on this in the future and see what I thought. Which is the point of this blog, so maybe it does fit… hmmm.
#11. Soundgarden – Superunknown
#10. Nada Surf – The Weight is a Gift
#9. Silversun Pickups – Carnavas
#8. Rage Against the Machine – The Battle of Los Angeles
#7. Pink Floyd – Dark Side of the Moon
#6. Jimi Hendrix – Crash Landing
#5. Semisonic – Feeling Strangely Fine
#4. Third Eye Blind (self-title)
#3. 311 – Sound-system
#2. Green Day – Nimrod

#1. The Offspring – Americana


Potentially Neat Amplifier

Hooray random ideas at work! I have this old stereo in my house now, but the amplifier is broken! Until I fix it, I thought I might be able to hook up this old head unit SLASH CD player from Sue to the stereo. And I was right!
The head unit in question is an old Sony CDX-L410X CD-R/RW from the Sony Xplod line. My dad bought this for my car for my 16th birthday, and I’ve replaced it since then with another head unit which can play MP3 CDs and also has an auxiliary input. But I figured I’d have a use for this one yet, so I kept it around. That time is now!

The speakers are Fischer speakers from probably the 80s? I think they are in the neighborhood of 60 watts, but this is a fairly meaningless specification. The important parts: they are pretty cool looking and sound good with a good amp.
To briefly explain the wiring for myself in the possibly near future, there were three wires connected to the +12VDC supply, and I am only sure what one of them is. The blue wire is the “signal” wire which normally would be connected to a vechile’s ignition to tell the CD player to turn on. One of the other ones is power (I don’t know which one) and the other one, I don’t know what it does, but it seemed to need power so I just mashed them all into one wire nut. Those two wires are orange (or red?) and yellow.
EDIT: The blue wire actually doesn’t do anything that I know of. Now I believe the yellow wire (with fuse block attached) is the power wire and the red wire is the signal wire. I put a switch on the red wire, and when I turn the switch off the head unit turns off and then beeps at me (supposedly to remind me to remove the face plate) which is how it would work in a car. So there’s that.
There are two ground wires connected to ground from the supply. One is connected to the black wire on the wire harness (where the other wires are plugged into) and the other one screws on to the case for chassis ground. In some head units, this chassis ground is made when the head unit is bolted to the car. The stereo wires are green and purple and come in pairs. There are two other pairs, because this head unit can potentially drive four speakers (front/back, left/right).
And it’s all powered by this random power brick! It can source 4.2 amps at 12VDC from a 120VAC source (like the wall) which perfectly simulates a car!
The next step is to build a cool and artistic enclosure for the head unit out of plexiglass and lights. I will be getting help with the “artistic” part.

Tackling Sue’s Exhaust?

Hello. Are you a mechanic/welder/exhaust specialist that I have asked to possibly rebuild my car’s (Sue’s) exhaust? Well, if so, here are some pictures just in case you don’t realize exactly what you are getting into.

Twenty-two years and almost 200,000 miles was not kind to Sue’s exhaust. We begin our journey at the exhaust manifold and heat shield:

I assume the heat shield has never been removed. Ideally I would like to have a custom header put on, instead of just a manifold. And I would like the heat shield eliminated. It’s ugly!
This is a bottom view of the down pipe from the manifold. The first few years of Sue’s life she was driven in upstate New York in the snow, slush, and salt. At least 16 years of rust has accumulated on top of the rust from the northern salt.
This is a view from the front of the car facing the rear, towards where the catalytic converter WOULD be…
Instead of a cat, there is an 18” steel pipe. Three bored, about-to-graduate college students were not kind to the catalytic converter. The rusted bolts pretty much disintegrated when removed, the rest were removed with an angle grinder. The cat is on Sue’s back seat.
You will want to rotate your head 180 degrees to see this picture. It’s not very useful but eh. Sometimes the best things in life aren’t useful. And, the piece de resistance (piece of resistance):
The muffler! Where IS it? Gone. That’s where. The “tail pipe” can be seen in the bottom of the picture, and a space for the muffler is clearly visible, along with some mounting holes. It fell off the car about two and a half years ago and Sue never looked back.
If you are still interested, and the price is right, please feel free to rebuild Sue’s exhaust, from the engine block to the tailpipe.

Transistor Organ

This was a pretty neat find. Apparently someone donated a 1971 Thomas Transistor organ to the Goodwill here. I saw it and freaked out a little bit in the store, because I’ve thought these types of organs were the coolest since playing around with them as a really little kid in church. Of course I didn’t so much play the organ then as I did just flip all the levers and mess around with it. But still, pretty awesome. Pictures!


UPDATE! I found out it’s possible to open the organ like a normal piano would open. What was inside!? I can’t wait to find out!


Dust, mostly. And a five year warranty!

Wind Power: Best When It Produces Nothing

It was recently suggested to me that I should add some commentary to my blog, in case one day in the future I wanted to be a journalist. So, considering the person who suggested it is a journalist, this will be my first venture into blog-commentary. But, keeping it in line with the style of the blog, I’ll hopefully be keeping the topics semi-technical and (when it overlaps) possibly slightly political. For some reason politicians think they know about science (in particular, energy) and that seems to create a lot of problems. I’ll keep updating the blog with things I build as well, so hooray!

So I was handed this article at work, and it explains why exactly wind power isn’t more prevalent than it “should be,” at least, according to the common folk and/or politicians who don’t try to understand more about the nature of the beast.
The article is a bit long-winded (har har) but explains very well why wind power is not good for electricity generation. The same principles can be applied to solar. In my opinion as an electrical engineer (albeit without my P.E.) it seems like a lot of the problems discussed in the article could be solved by pairing a wind farm with a specially-built natural gas turbine to even out the generation. Solar Thermal Arrays usually use the same sort of idea, which I will more than likely discuss later on.

110VAC Hardwired in the Truck

I’ve decided that this post is going to be short, because the pictures should be pretty self-explanatory. I just need to get a couple notes in so I don’t forget them myself. The goal was to hardwire standard power (120V AC) on my truck’s dashboard instead of having an inverter flying around everywhere, loosely connected to an amplifier. I’ve found that AC is useful to have around, if you need to charge a laptop/phone/the Brypod or if you get locked inside of something and have to pull the Dremel out to cut down a fence. I have used an 800-watt inverter in my truck for about six months, it came out of a power supply I built about three years ago. Any way, I hit the junkyard and got this part for free, cut some holes, painted it black and coated it in acrylic, and bolted a switch and a power outlet to it. (I didn’t want to cut into the one that was in my truck, in case I decide to sell it later on.)

Hopefully this shows the wiring on the inverter well enough. The only real shortcut I made was using 14/2 house electrical wiring instead of 14/3, and using the grounding wire as the 12V signal for the relay coil. The black and white wires I used for 120V hot/neutral, and I bolted the ground for the 120V and the 12V to the same point, just for simplicity. I assume the white insulation around the wire bundle is enough to handle 12V, and this has been in my truck for two days now and it hasn’t caught on fire so I’m probably right.

The wiring up at the front of the truck was less glamorous, but everything fit in all nicely when I put it together, which I was a little worried about because things are kind of crowded up in the dashboard any way. Hopefully I never have to take this part off again.

The inverter is mounted under a plastic cover behind the driver’s seat where the jack is stored. There was just enough room. The extra wires are there in case I want to put in another amplifier for the stereo. Just in case.

Here’s the finished product. The switch on the left is the standard safety switch I’m such a big fan of, it controls a relay that I soldered to the switch on the inverter itself. The LED on the switch lights to indicate the relay coil is energized, which should mean that the inverter is on. Also I made the mistake of turning the truck on with that airbag switch unplugged, so now I’ll have to reset it for the third time. I hate that light.
And just for fun, these are the two 10” MTX Thunder 5500’s that I keep in my truck. The driver’s seat was out so I snapped a picture. No one can really sit in the back seat any way, so this is a much better choice for the space.