The iPod finally gave up all the way. The screen still works but it doesn’t play audio even if it’s cold. As a stop-gap in the awesomeness that is fridge speakers, I had been using the “brypod” to play the fridge music, but I wanted that back for listening to music in other places. So I took the old Gateway computer I have, put a fun version of Linux on it, and made it play the music in the fridge. As a bonus: This computer also has a parallel port (a consequence of it being about 12 years old) which I will eventually use to control other things in the kitchen over the internet, such as the slow cooker. This is how I did it!
First! I downloaded the Ubuntu 12.04 x86 (32-bit) alternate desktop installer and burned it to a CD-RW and used that to install Ubuntu to the Gateway. This led to a problem that is becoming worse and worse with Ubuntu: despite having an “alternate installer” for old computers that don’t have enough system resources to run the GUI, it’s either impossible or very difficult to boot it to a command-line interface once it is installed. To me, this seems to defeat the purpose of having an alternate installer, but I also don’t claim to be any sort of Linux expert. But any way! I spent about two hours coaxing the resource hog of a GUI into a terminal window so I could do something useful.
sudo apt-get install lxde
This installed a new GUI called LXDE which is extremely efficient and light-weight (unlike GNOME/Unity), without being downright unusable and terrible (unlike Fluxbox). After logging out and logging in to my LXDE session, I was able to actually use the computer.
This installed all the system updates as well as the tools I will be using on this computer:
VLC, a versatile media player (easier to manipulate than my personal preference, Rhythmbox)
SSH, which allows me to login to the computer remotely via command-line
X11VNC, which gives me remote desktop control (so I don’t have to have a monitor/keyboard hooked up to the computer).
I needed to configure the remote desktop software to start automatically at boot.
x11vnc -storepasswd
It is necessary to have a password. Next: I went to ~/.config/autostart and created a shortcut named X11VNC.desktop. (It is necessary to create the autostart directory if it does not exist already.) The file should look like this:
Now I need to configure the computer to automatically log in to an LXDE session when it starts up, so I don’t have to type in a user name and password. I changed the lightdm.conf file from this:
The next step is to install folder sharing software (samba) so I can easily drag and drop music to the computer for my refrigerator listening pleasure. I decided to share the Music folder (~/Music) over the network. (I could have used SSH to do this, but it’s a lot easier to drag-and-drop).
Once all the music I wanted was on the computer, I moved all the .mp3 files to one folder and created an .m3u playlist:
ls -d * | grep .mp3 > "${PWD##*/}.m3u"
This creates a file called ~/Music/Music.m3u. The final step is to tell the computer to start VLC when it boots, AND play this playlist file when it starts the program, AND turn on repeat and shuffle. This was accomplished by making a file called vlc.desktop and placing it in the autostart folder.
That’s it! Now the computer plays fridge music, is accessible remotely by VNC, SSH, and Samba, and is ready to start controlling things in the kitchen over the internets!
I’ve always wanted to play around with a solar panel large enough to do something useful. Since I occasionally drive my truck well into the middle of nowhere, running some of the electronics in it (the stereo, the radio equipment, or the inverter) off of a solar panel seemed possible, but as a secondary goal I also decided I would like for the solar panel to run the cabin fans during particularly hot days to keep the heat manageable (I live in South Florida). Most of what I have done up to this point is proof-of-concept, and I am not planning on having this particular panel permanently attached to my truck.
As an electrical engineer in the power industry, I must start this with a disclaimer: my goal is NOT to offset any of the fossil fuels used in my truck with solar. From my experience, there is a pervasive belief that solar photovoltaics are much more practical than they really are. However, to put it in perspective, to even offset 20% of the power my truck’s engine normally produces, the solar panel would have to be around 3,000 square feet. My engineering opinion in a nutshell is that energy from solar photovoltaic is useful in remote, sunny areas, but solar thermal should be used for any sort of large-scale power production.
Nevertheless! I found a 50-watt panel for dirt cheap that should work pretty well for what I want to do: essentially turn my truck into a portable battery that will be able to run the electronics worry-free if it runs out of gas.
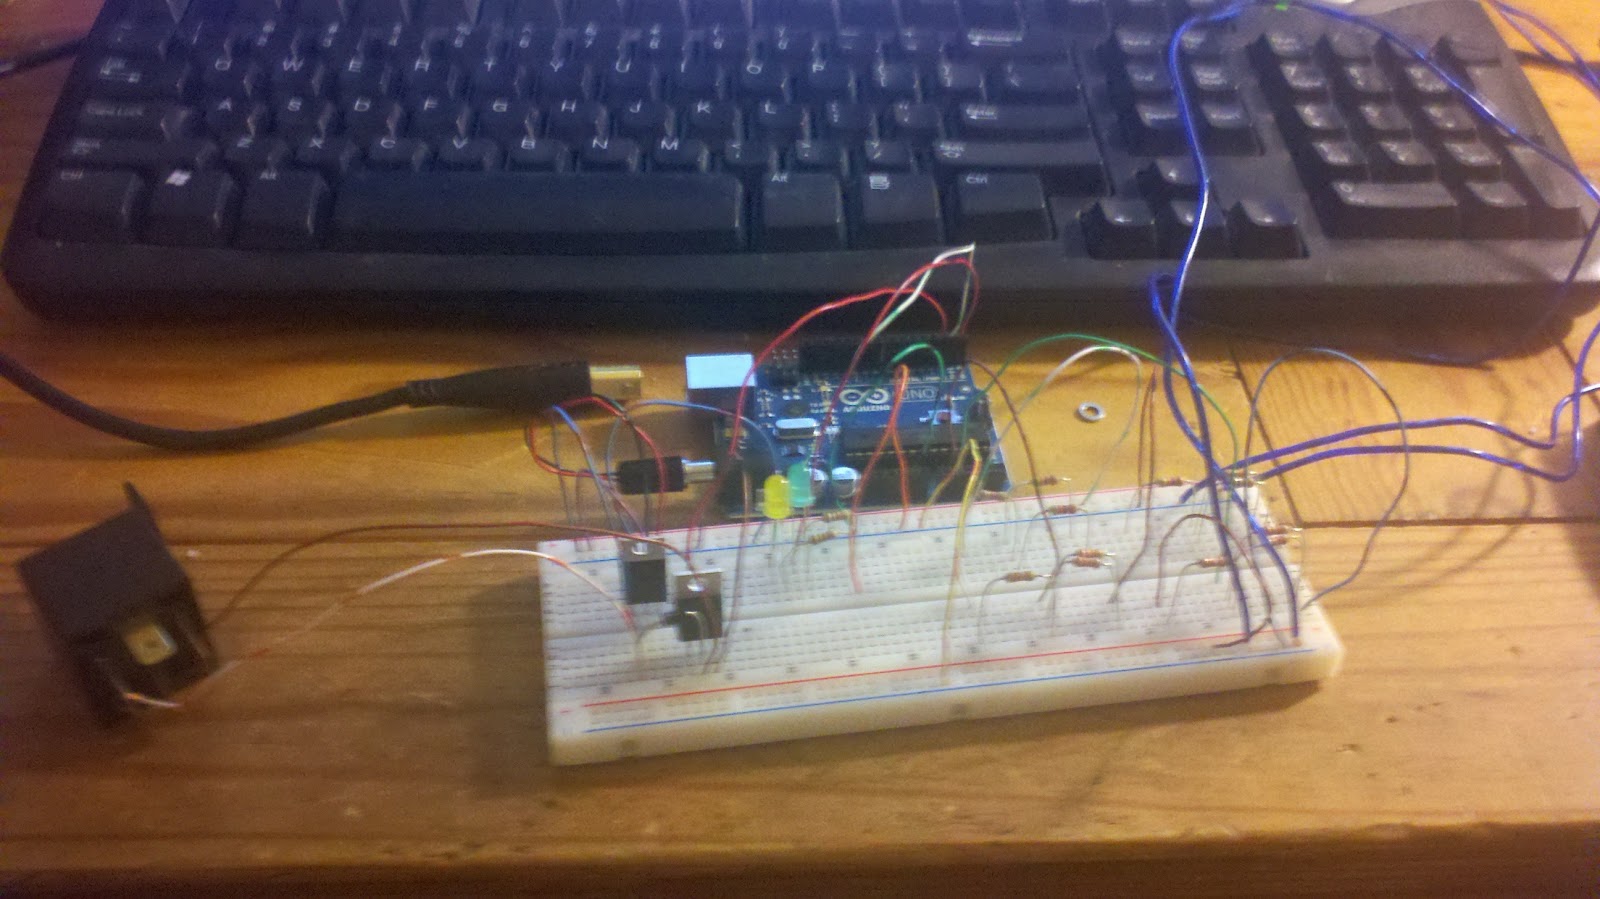
When I first started this, I thought, “Surely I can tie a solar panel to my truck’s electrical system. Shouldn’t take more than a week to build a charge controller!” So here I am, two months later, with the finished product. The theme of the day is “how much I hate programming” which, as anyone who knows me will attest to, is “a lot”. Sure, I could have just bought a charge controller, but what fun would that be? But I also wanted the ability to add additional functionality, and I would like for the Arduino will eventually expand its programming to include solar tracking, so it keeps my options open.
Another thing that I would like to point out is that I will be wiring the panel (via the controller) essentially straight to the battery, rather than directly to individual loads in the truck. There are two main reasons for this. First, it greatly simplifies the design and the work involved. Second, many things need a very smooth, constant power flow, which a solar panel like this simply cannot provide. When all of the energy is sent to the battery first, the battery acts as a sort of capacitor, storing and smoothing out the erratic energy from the panel so it can be used safely and efficiently by any device in the truck.
The first step, however, was to make sure that the power from the panel didn’t overwhelm the controller. The panel produces 20V open-circuit, which may not harm the microcontroller immediately, but may degrade it over time. I stuck a 12V regulator (with heat sink) in the circuit to help the Arduino out a little bit. The other chip is the transistor that will drive the relay that will control when the solar panel delivers power to the battery in the truck.
The battery can be damaged if it is over- or under-charged, so the general idea is to measure the voltage at the panel and at the battery, compare the two values, and then have the microcontroller decide if the battery needs help from the panel. The voltage at each point was sent through a voltage divider to get them both down from the 0-20V range they are at normally to the 0-5V range that the Arduino likes. I chose 12.4 volts as the “low” point for the battery, where the panel will send energy to the battery (provided there is enough sunlight) and 14.4 volts as the “high” point where the microcontroller will disconnect the panel to keep from damaging the battery.
That is a rental Sentra. Not because I was afraid to hook this up to my own vehicle, but because my truck decided to randomly blow its rear main seal and spew crank and gear oil all over creation. But we persevere! The tests on the Sentra were promising, but the programming needed some tweaking. I also found out that the controller behaves erratically when it is not hooked up to the battery first.
This video shows some of the action from testing it on my homemade bench power supply (not pretty, but gets the job done):
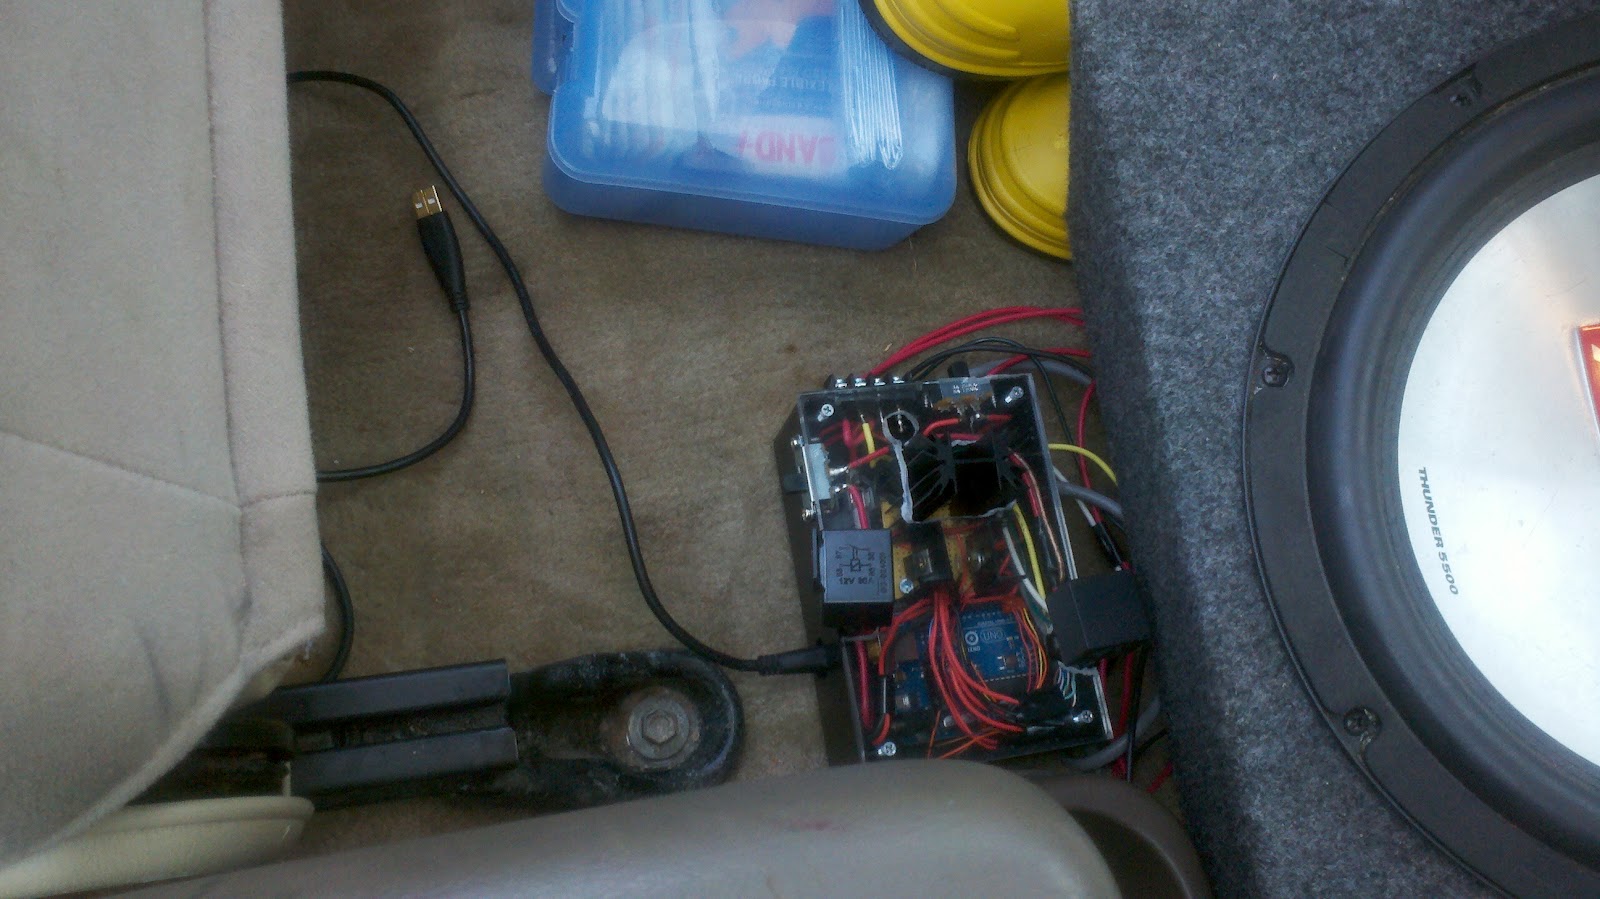
Any way. On to putting it all together! Since I don’t intend for this to be bulletproof or permanent, I put it together from stuff I had lying around. If you have read my blog extensively, you will notice that the enclosure is from the remote kitchen light switch I built a long time ago.
Building the circuitry. The large heat sink is for a Schottky diode. This prevents the battery from discharging back into the solar panel when there isn’t any sunlight. Without the diode, the panel would behave as a resistive load in low-light conditions and drain the battery (and possibly damage the cells). This was more or less just a precaution though. Since the panel provides power to the microcontroller and associated circuitry directly, in low-light conditions one would assume that there wouldn’t be enough energy to drive the relay. What I actually found out was that a surprisingly low amount of light is enough to turn everything on. Plus, since I’m an electrical engineer, plopping a precautionary diode in the circuit is much easier than doing any sort of programming, or trying to predict what the Arduino will do if it gets random spurts of power with a voltage less than 5V.
Addition of the relay and microcontroller, as well as a 10-amp main fuse (because I didn’t have any smaller than 10 but greater than 5) and a 1-amp fuse to protect the Arduino and power transistor.
Preliminary layout in the enclosure.
Attached to the truck for testing. The red LED indicates that the panel has enough power to run the microcontroller but nothing else (very overcast days, dusk and dawn, etc.). The yellow LED indicates that the panel has sufficient power to charge the battery but the battery already has a full charge, and the green battery indicates that the panel is supplying power to the battery and/or the rest of the truck’s electrical system.
Testing on the truck this time.
The second relay was added to control power delivery to the fans in the truck. It is a SPDT relay with the coil connected to the truck’s ignition. When the truck turns on, the fans behave normally, and when the truck is turned off, the fans are connected directly to the panel. I was able to splice it in to the control circuitry in the truck with little issue. To further reiterate how little power solar panels produce for their size, this panel barely has enough energy to spin the cabin fans at their lowest setting in direct sunlight.
A second video illustrates the panel and controller being tested on the truck.
A rousing success! Next was to attach the LEDs somewhere where I could see them easily. I used CAT5 ethernet cable for this, and used the final twisted pair out of the set of four twisted pairs to hook up a reset button for the Arduino, just in case things got wily.
I drilled these into the trim around the stereo’s head unit and the CB radio and soldered the CAT5 cable. I used a regular ethernet jack here as well to enable the trim to be removed easily.
The red button is the reset for the Arduino.
I also used this project as an excuse to add a voltmeter to the truck. The black button turns the voltmeter on if the truck is off, otherwise it turns on automatically when the truck does via a small 12V relay I wired to the ignition. The voltmeter will also be helpful when I go off road, in the event I drive through a river and the alternator fails. Not entirely out of the question.
I stored the unit behind the passenger seat and ran all the wires under the center console.
Propped up in the bed. The tailgate can be lowered if the sun is lower in the sky.
The chain is because, as I mentioned, I live in South Florida. This also shows the special weatherproof MC4 connectors that came with the solar panel.
This was installed in my truck for about two weeks and worked great! It didn’t even start any fires. It does charge the battery much better than it runs the fans though, so if I want to do that better I’ll have to upgrade. For the future! I plan on building a custom panel that will produce more power and mount to the top of the toolbox (so it doesn’t always waste bed space). Optionally I could have both panels running in parallel for around 130 watts of solar power. The next things I am going to work on are a maximum power point tracking circuit and a solar tracking device. I’m worried that solar tracking will consume more power than it creates, but maybe I can think of a more efficient way to do it. We will see!
A while back I posted a list of some of my favorite albums of all time. Notably, I left of Deja Vu by Crosby, Stills, Nash, and Young, but that’s neither here nor there. Any way, in the same vein, I thought I would post my five favorite music videos to date. Just for a little fun.
Red Hot Chili Peppers – Otherside
I remember being blown away by this one in middle school, and probably the fact that I still find it so mind boggling is why it makes it to #1.
Goo Goo Dolls – Broadway
What are they trying to say? They feel like old men? Everyone is a rocker deep down inside? Whatever it is, I approve.
Coldplay – Strawberry Swing
The amount of time this probably took is mind numbing. Bonus points for the trippiness factor.
Weezer – (If You’re Wondering if I Want You To) I Want You To
There’s a lesson in here. One we should all follow!
I have a new project on the horizon that I think is going to be… interesting, to say the least. I won’t go into that now, but I needed to build some tools before I can build what I actually want to build. This tool will be useful for much more, though.
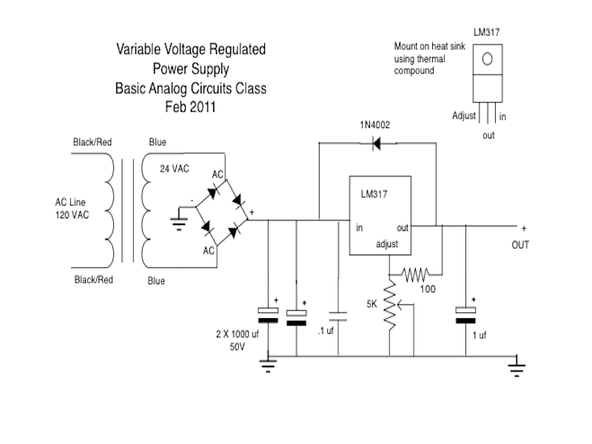
First thing was to build an adjustable DC power supply. I had some LM317 chips around which are essentially variable voltage regulators if they’re hooked up to a potentiometer, so that’s exactly what I did first.
I had most of the parts lying around, I had to go to Radioshack for the 120/24V, 2A transformers and the rectifiers and some other odds and ends. Once I got this one working and made sure I could actually adjust the voltage with the potentiometer (knob) the second step was to build a second one.
Once the second one was built, I connected them together in series. Since they are not grounded to a common reference point, the idea was that two 0-34V adjustable DC power supplies could make one 0-72 V adjustable DC power supply, by connecting the positive rail of one power supply to the negative rail of the other. I got this idea from almost blowing apart a $300 power supply in one of my labs, thus proving the idea that if you’re not making mistakes, you’re not learning.
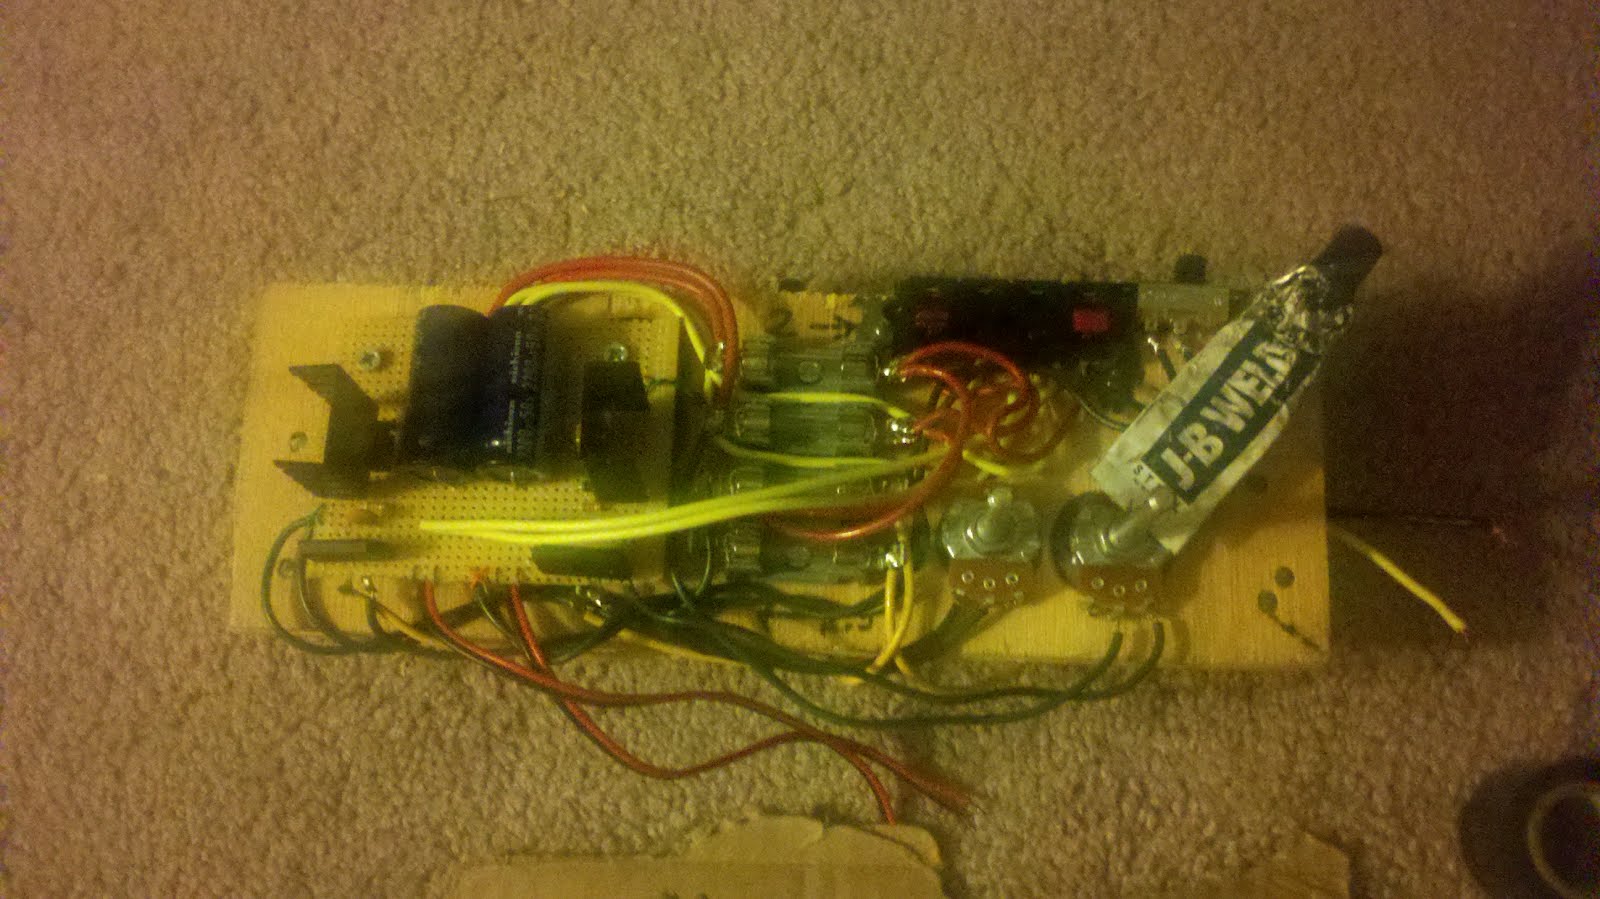
The next step was to solder it all together.
The two sets of prongs on the top are for the AC input. the red and yellow leads are the positive and negative rails for each power supply (I didn’t have any black wire for ground wires so I used yellow).
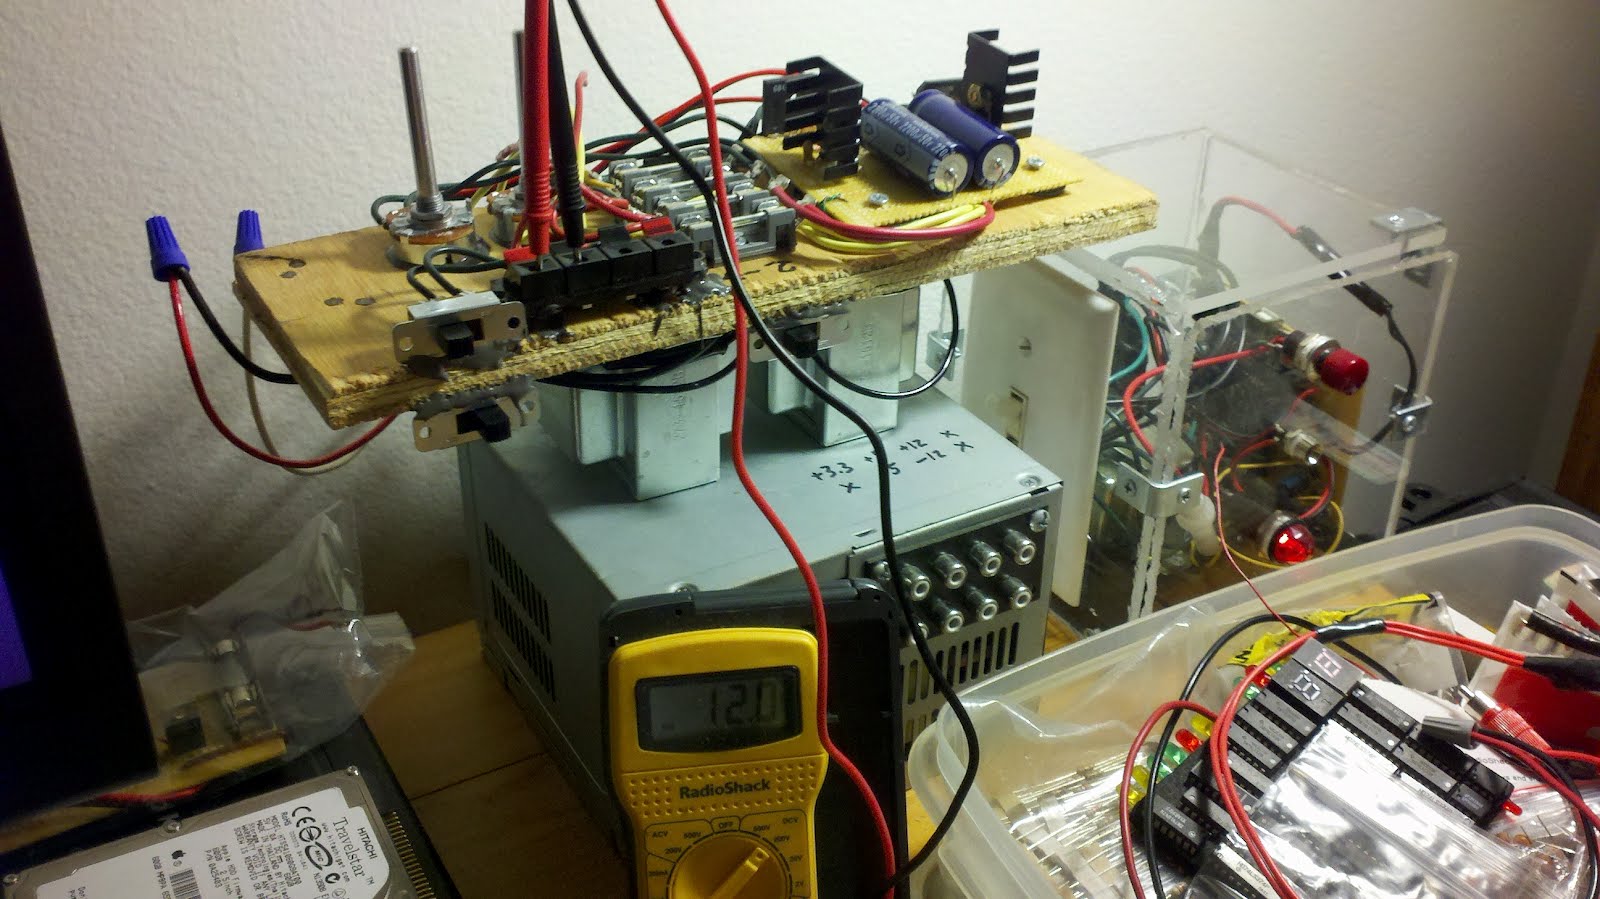
Time to start assembling it all together. I didn’t need it to be pretty, it just had to work. So I got a piece of scrap plywood and started screwing down all the parts. I decided I could save space by making the transformers “legs” by mounting them to the bottom, and attaching the rest to the top.
I screwed the power supply electronics to the top next and then set out to JB weld some of the smaller pieces to the board. The two switches on the bottom turn on the power supplies (so I can run just one if I don’t need both) and the switch on the top left ties the two together for the one 74V DC supply. I also added the heat sinks to the LM317 chips.
Next I attached the output terminal (it’s a former terminal for speaker hookups for an old stereo that stopped working) and the potentiometers to the board, also using JB weld.
The nearly finished product…
Once everything was together I could make sure it all worked before going farther. This shows my voltmeter hooked up to one of the supplies, outputting about 12V…
…and, with both power supplies turned on and the tie switch on, the power supply outputs about 70V. Looks like everything checks out.
Time to add the finishing touches. I found these little voltmeters on a site called Adafruit and decided to take a risk. They’re about as big as my thumbnail and only draw 40 mA.
I got a piece of plexiglass and a DPDT center-off switch (from a previous project involving a former bathroom of mine, actually) and attached LEDs. The switch lets the voltmeter switch between monitoring one power supply or the other, thus saving me from having to install two voltmeters (the switch is MUCH cheaper than the voltmeters are) to monitor each power supply simultaneously. The two wire nuts on the left side of the image are the 120V AC hookups. The color coding is my own scheme, but if you come over to my apartment I would recommend not touching any of it unless I’m around and you’re sure it’s off.
That was the diagram I used for the power supplies. Pretty straightforward, I just took it slightly farther by building two and tying them together. Similar power supplies can be bought for around $300 but I decided I could build my own for a little less money. It’s not as pretty but it does the same job, outputting 1.5A DC anywhere from 0-36V and 3.0A DC from 0-74V. Now that I’m done with this, I can start working on my next project, which I’m sure will be legendary.
Finally paid to get internet in my apartment for the first time since July 2009. Since then I’ve been rouge, updating on my phone and various other ways. Any way! I no longer have the huge Dodge 1500. I fixed the exhaust leak which was the last thing it needed, and returned it to Alabama. Success! Here are some of the pictures of the exhaust leak getting repaired.
This was the location of the leak, right where the pipe from the cat joined the pipe going to the muffler. You could hear it really well with the truck idling but the location had to be pinpointed with a stethoscope. It’s hard to see the leak because it was very small.
This picture shows the joint a little better.
Welding the leak shut on the lift.
Finished product. I also removed some metal advertisements from the dealer that were on the mud flaps. Looks a whole lot cleaner I think, and no more exhaust leak ticking! Winning.
Also I just moved to Florida and snapped this picture in a restaurant in January in Riviera Beach. It was about 70 degrees, so we went to the marina where the birds just fly around in the rafters.
I found it for dirt cheap and it only needed a little bit of work, including a new speedometer and new horns. And some TLC. I thought I might be able to make some money by flipping it. Then I decided instead that I should move to Florida:
So I loaded it into the truck bed and put Sue on a trailer and drove 14 hours. And I think it put a little stress on the truck’s springs:
It ended up making it down just fine, but it was a little worrisome. (Those will be getting replaced pretty soon.) But! About the same time as all of this, I designed and built a circuit that will hopefully connect to Sue’s center brake light, so whenever the brakes are pressed the center light flashes eight times and then stays on until the brakes are un-depressed.
Currently Sue doesn’t have a center brake light because I removed it to remove the back dashboard, so I could put some speakers in back there, and when I pulled the cover off the entire housing for the brake light disintegrated. So once I get a new center brake light built I will be able to attach this to it:
The only thing I couldn’t quite figure out about it is that it seemed like it wouldn’t flash exactly eight times every time at first. If I flipped the switch for it off and on without waiting a few seconds, it would behave erratically. This was fixed by putting a capacitor from the positive rail to the ground rail but I’m not sure exactly why this stabilized the behavior of the circuit. I have lots of ideas about why but there’s no telling exactly why without an oscilloscope and some other things. More pictures in the future when Sue gets fixed up!
Well Verizon decided that their “unlimited” data plan is more “unlimited*” than truly unlimited, and they restricted my ability to tether my phone to my computer for the time being. At the same time I am moving to Florida so I wasn’t about to have the internet folks come hook it up at my apartment in Tennessee right before leaving. ANY WAY even though I haven’t had internet I’ve still been building neat things.
I had a GPS charger hooked up to a motorcycle (because the motorcycle doesn’t have a speedometer that works) but it wasn’t weatherproof. So the mini-USB port on the end got corroded and unusable and I cut it off. I decided I would use the business end of it to wire up a female USB port to the dashboard of my truck.
Here you can see part of the shell for the electronics that would normally plug into a cigarette lighter-type outlet, and the female USB port I am planning to wire it to.
These are the electronics that convert the 12V from the car battery down to the 5V needed for USB and other miscellaneous things like GPS units. The converters I’ve built in the past have used a regulator, which wastes a ton of energy. This unit is a buck converter which is much more efficient than a regulator.
All I really did at this point was solder in a fuse on the 12-V side (since the one the original equipment had was embedded in the plastic shell covering the electronics), solder the USB port up (making sure to solder the data wires together, as I learned in a previous post), wrap electrical tape around all of the sensitive parts (including the entire electronics module, it had exposed electrical parts that I wouldn’t want rubbing on things inside the dashboard), and clip it in to the wiring for the CB radio.
I used JB weld on the inside of the piece of black trim to hold it in place. If you zoom in you can see some of my sloppy work with it. It is very strong though. The only problem is that I believe I clipped it too close (electrically) to the CB radio, and now if the truck is off for longer than 15 seconds or so the radio forgets what channel it was on and resets to channel 9. This is only a minor problem though, it may or may not be fixed in the future.
Any way, I can now charge anything by USB in the truck now! Cell phones, iPods, GPS units, anything that runs off of 5V. I suppose I only did this because I could, I have two 12-V cigarette lighters that I almost never use (not to mention the 120V AC outlet), so it’s not like I’m pressed for numbers of outlets. Still neat though!
So the last pictures of my truck’s new bumper weren’t super. So here are some great before and after shots! Also this is making me realize that maybe the 105-pound bumper and 90-pound winch squatted the suspension down a little more than I thought, so I will soon be going back in to lift it back up. Fun times!
I managed these pictures by driving in to the wildlife management area with the old bumper, taking pictures, driving out and putting the new bumper on, then driving back in, removing all the leaves from the trees. trying to get in the same spot as before, and taking another set of pictures. It was a hard day! Also, Lake Jocassee magically fell 40 feet.
OH NO the stickers give it away! Yeah, these were taken on different days, in different seasons. You got me. Bonus: On my way back to Tennessee some old guy mistook my truck for a racing vehicle of some sort because of all the stickers. That’s a victory in my book.
The key lesson here is easy so I’ll get right to it: Disc brakes are much easier to work on than drum brakes. That being said, here are some highlights and before/after pictures from my recent brake job on the Dodge 1500. Maybe there’ll be a lesson in here somewhere…
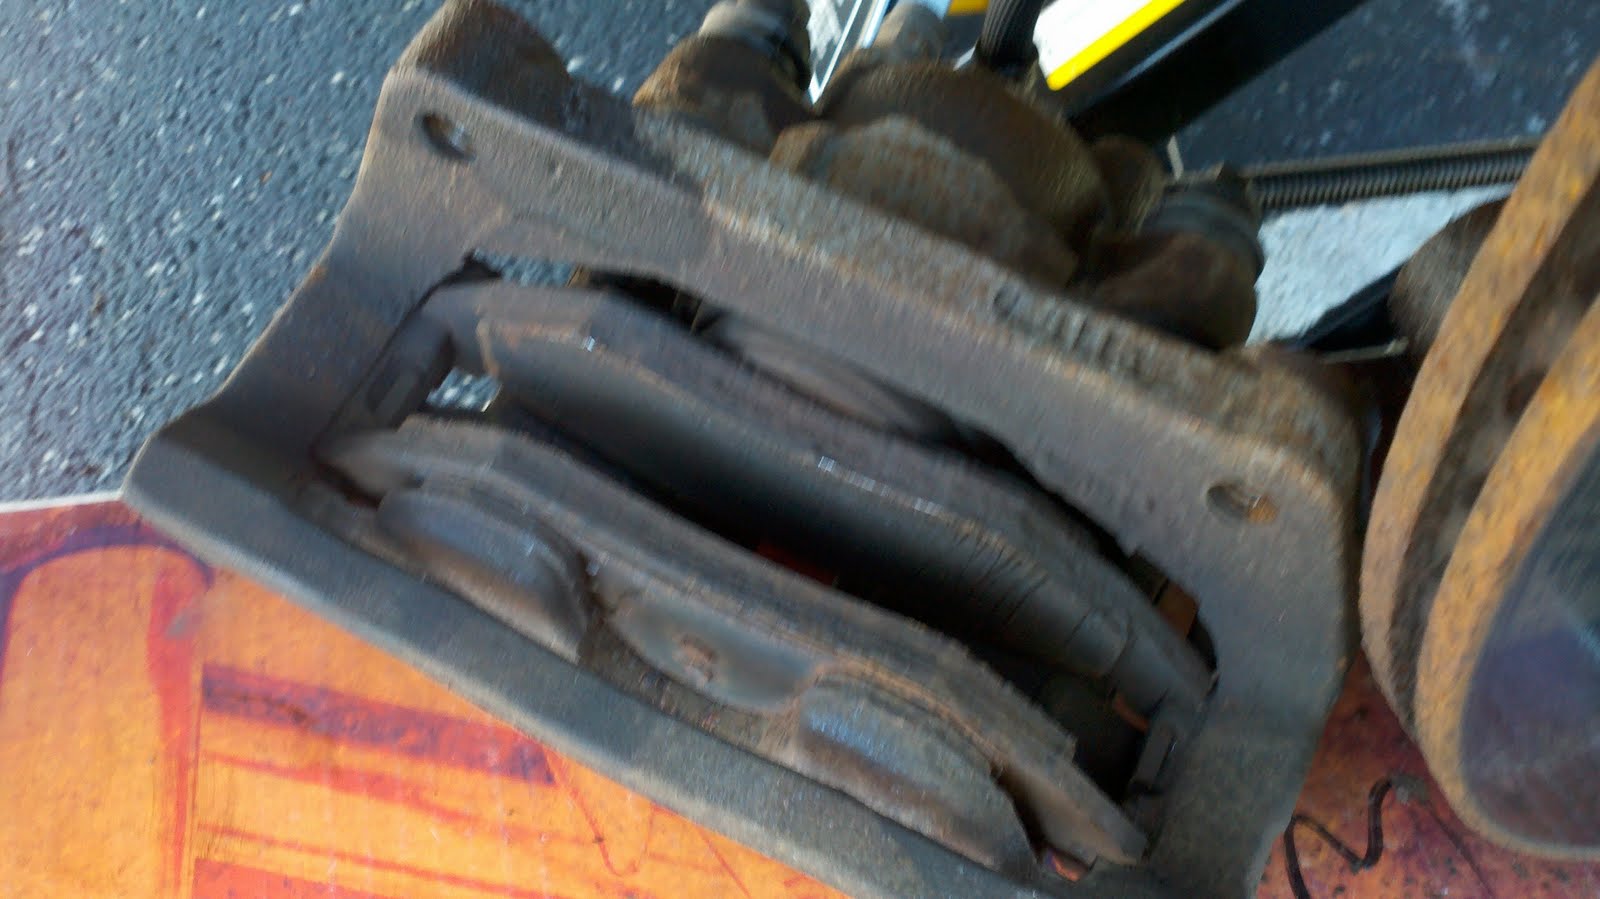
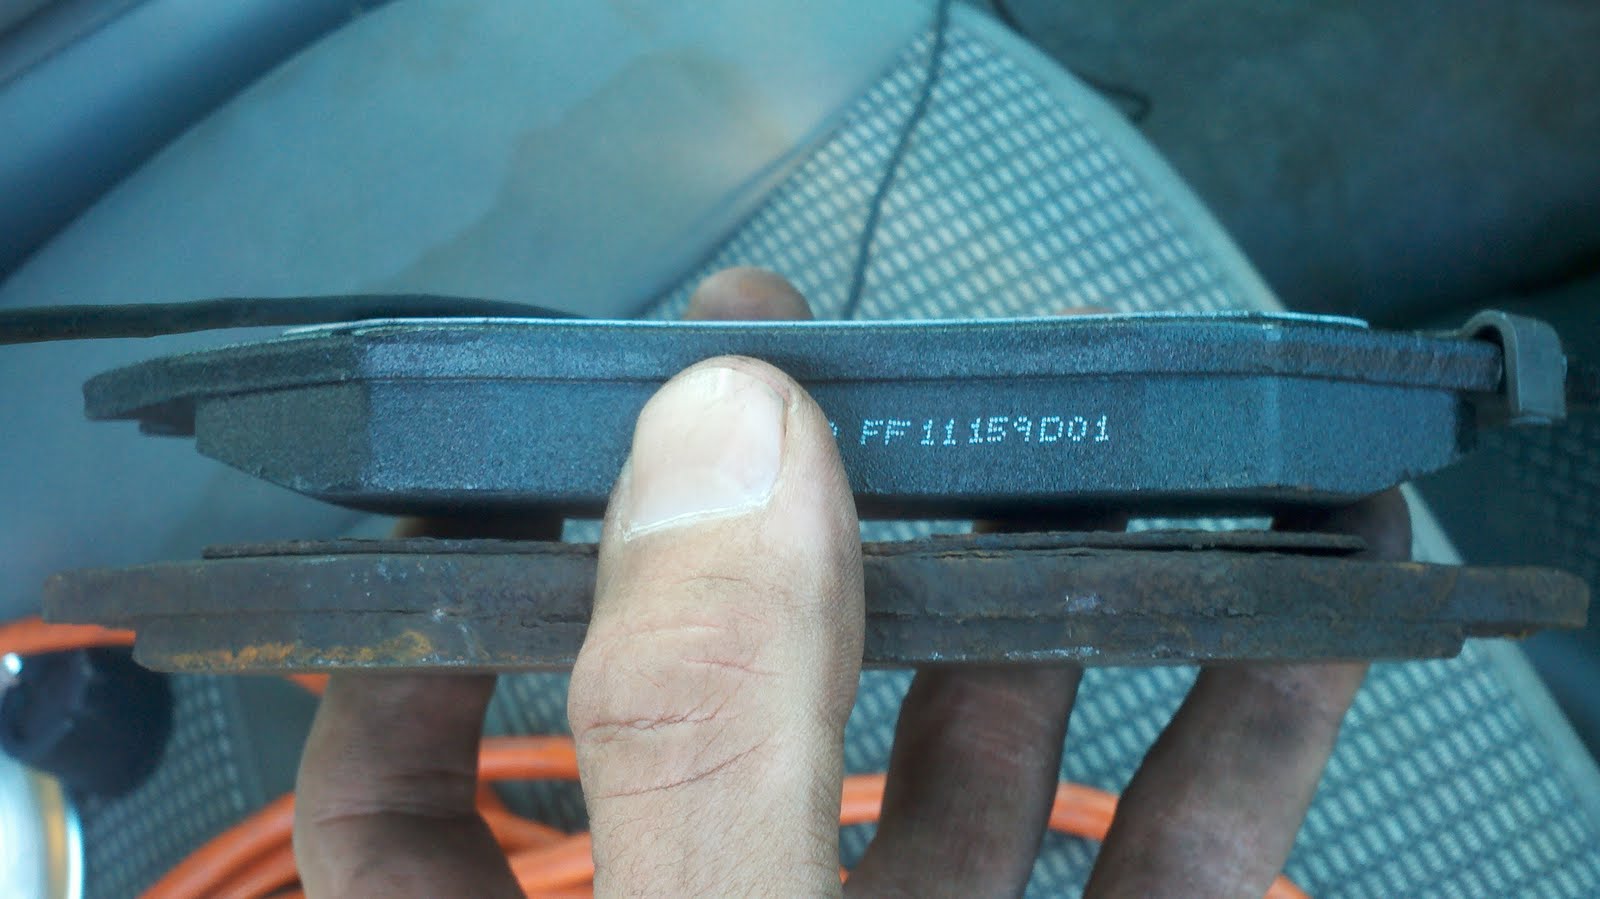
These are one set of front brake pads before replacement, showing obvious signs of wear.
These pictures are before and after having the rotors turned at O’Reilly. The drivers’ side rotor was seized on the hub pretty solidly, it took about fifteen minutes of banging on it with my 3-pound dead-blow hammer before it finally popped off, just as I was about to give up. The rotor on the passenger’s side came off after three good hits. There was plenty of thickness/life left in the rotors at only 64,000 miles, but they did have a slight warp to them which was causing the steering wheel to freak out (scientific term) whenever the brakes were applied. That has been fixed, and everything is ship-shape.
Brake pad before/after comparison. Not much left on the old ones.
Everything has been put back together on the front! Shiny, turned rotor and new pads. It took me about half an hour to figure out how the retaining springs on the pads went back on but I eventually got it. Sometimes it just takes a little bit of concentration, and the realization that it’ll all fit back together just like puzzle pieces.
Time for the rear brakes!
I decided that the rear rotors looked pretty good, so I did not have them turned. Rear brakes on any vehicle usually only provide about 30% of the stopping power so the components are usually smaller and wear out slower. (On this particular truck, the front brakes have two pistons per caliper and the back brakes only have one.) I also didn’t have the parking brake rebuilt or replaced, since the truck has such low mileage.
Old pads, still in the caliper assembly.
And a comparison of how much they had worn down, side by side with the new pads.
This also shows some of the corrosion that has occurred over the years. I think the truck may have been driven in a salty area.
Finished! Everything went smoothly, only minor speed bumps to this job. Everything is clean too! I went through a whole can of brake parts cleaner. Super! No real lesson here so I’ll finish it off with an awesome picture of a breaker.
(A quick update on the last post: I forgot to mention I didn’t drive out to or back from California. Google Maps isn’t really intended for plane rides. The rest of the mess on the Eastern Seaboard was driving though.)
So when I flew out to California two weeks ago, there was an interesting film selection for the in-flight movie. The category is one I’ve always found interesting because if even one minor thing was changed in an otherwise formulaic storyline it would be the most interesting movie ever because it would have broken the “rules” of the Chick Flick.
For example, if for some reason the protagonist of whichever movie didn’t end up with the right guy in the end. I think in real life this sometimes happens, because real life is rarely like the movies. I can’t think of a single example of some couple I know that’s together because the guy was overly persistent (see: When Harry Met Sally). Social norms aside, I’m also wildly attracted to movies and books with surprising endings, which are not necessarily “surprise” endings, although those are good too (Fight Club and The Sixth Sense spring to mind). Good examples include 2001: A Space Odyssey and 1984.
But any way, I thought about this later on in the trip when I had plenty of time (while I was putting a new starter and battery terminals in the Blue Bomber, our family’s ’96 Honda van with nearly 200k, in the picturesque and lovely town of New Haven, Connecticut) that maybe in real life when the girl doesn’t end up with the right guy, or things don’t work out between two people, that maybe this would just be cutting the movie off in the middle. There’s still more life to get to before the end of the movie. So, maybe the otherwise superficial movies are relatable to real life, but end of the movie isn’t obviously approaching.
Now comes my opportunity to tie this thought into a new project: I am currently in the care of a very large Dodge Ram. It’s currently parked next to my Frontier. It’s the 2005 Big Horn edition of the 1500, and the engine is approximately four thousand times larger than the V6 in my truck. I am taking care of it for a friend of mine while he’s deployed in Iraq, and when I got it, it only needed the brakes rebuilt and an exhaust leak somewhere welded shut. Now it seems to have developed a problem with the EGR valve, which in my opinion shouldn’t be built into cars at all, but once it’s designed to be there, if it malfunctions it will kill the mileage on whatever vehicle it’s on.
I’ve heard that a good way to fix a stuck EGR valve is to spray the inside off with carburetor cleaner and the plunger will magically spring back to life! So I took the air box out of the truck to give myself room to work:
Then I unclipped the wire from the top of the valve (the valve itself is the soda can-shaped thing to the left and slightly below the alternator, if you’re looking at the engine from the front of the truck, which in these pictures is on the right). The next step was unbolting two 8mm bolts and two 10mm bolts holding the valve on the engine. The reason this is interesting is because it’s a Dodge so I was expecting the bolts to be standard, not metric, but apparently Chrysler builds some of the Hemi engines in Mexico, where they use metric tools. Like the rest of the world except the United States. Frustratingly. Any way! This is not really surprising, as almost no cars are completely built in any single country any more regardless of brand name.
Once the valve is out (being careful not to lose the two thin seals attached to each side of the valve) I sprayed it excessively with carb cleaner and worked at it with a screwdriver to try and get it free. And apparently it worked!
(That says 22.3 mpg. It averaged 18 driving from Fredericksburg, VA to Manchester, TN.)
…for a little bit. After driving it around for a little bit getting amazing mileage (actually about 4 mpg better than my much smaller Nissan), the check engine light came back on and I started losing mileage, which I assume is the result of the (apparently unfixable) EGR valve. But! This repair is currently in the middle of the movie! The truck just needs a little bit more work, a little bit more persistence, to get to the end of the movie, which will most likely involve a brand new EGR valve.
And even though I like to talk about how working on cars makes me feel better because everything is right in front of you and makes sense and fits together in rational ways (unless it’s the electric system on a British car), sometimes things just don’t work out. But they will eventually! Once you make it to the end of the movie and get the new EGR valve. Or make it to any number of other things that this metaphor could potentially apply to…
(Hint: This metaphor was not originally thought of in regard to truck repair but it fits! And ironically, the check engine light came on while I was driving the final leg of my vacation. But! Now the truck has cleaned battery terminals and a battery, starter, and alternator that have all tested good. Plus fresh oil! And I’ve learned a lot already about Mopar engines, like how once you disconnect the battery and reconnect a new one, that the computer has the starter turn the engine over about a flobbidy jillion times so it can get the cam and/or crank sensors re-calibrated. Thankfully. I thought I had broken something.)